![]()
![]()

MOTION CONTROL
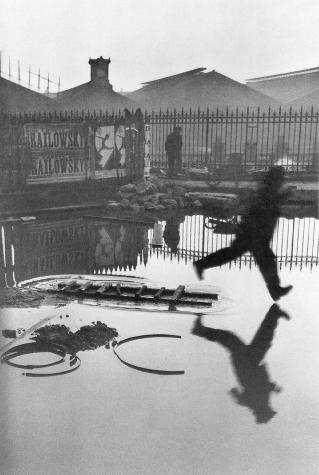
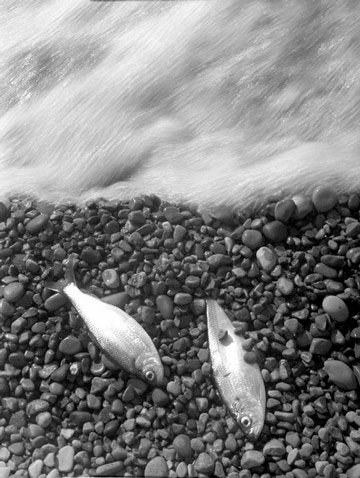
Henri Cartier Bresson-"Decisive Moment" Paul Pearce "Go Fish" Paul Pearce "Syracuse Ballet"
We first learned how to control our exposures with the "Black White and Gray" execise. Keep this in mind when making motion photographs. Adjust your evposure value to get a properly exposed image.
Make sure you understand how to adjust the shutter speed by changing the aperture (aperture priority mode).
This is how we did the exercise in class.
The goal of this assignment is to understand and master the use of shutter speed to control how movement looks.
You have to use a tripod to do this assignment.
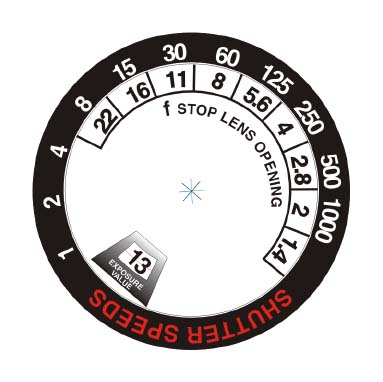
You can use the “Equivalent Exposure” wheel to help check your changes in shutter speed and aperture.
Phase One ~ Make a series of photos of moving subjects (bracket your speeds)
1) Find a subject that is moving in moderate light. Direct sunlight is too bright to allow slow shutter speeds. If the light is too dim, you won’t be able to freeze the motion with a fast shutter speed. Cloudy or shady outdoor light and bright indoor light should work best. The light in our classroom is just about right. Your subject should be predictable and consistent. When starting out you should simplify what you shoot. Pick something that won’t stop or move away as you set up to shoot. The lighting should also be consistent.
2) Set up your tripod and compose your photograph, framing to concentrate on the motion and eliminate distracting elements. You will make multiple exposures at different shutter speeds without moving the camera.
3) Set your camera to "aperture priority" or change the aperture first and then check the exposure. If you subject is lighter or darker than "medium gray" make exposure value adjustments to get the correct exposure.
4) Adjust your lens opening (f/stop) to the smallest opening (highest number) like f/16. This will require a long shutter speed to give you the proper exposure. Make your first exposure.
5) Change your lens opening to the largest opening (lowest number) like f/2 or f2.8 and change your shutter speed to get the proper exposure. Your shutter speed should be much faster. Make your second exposure.
If the lighting is not optimal, you might not be able to use the largest and smallest lens openings- changing the light will help (lighter of darker).
Repeat this sequence with 2 more subjects, try for variety. Try to go beyond shooting anything that moves.
NO ANIMALS, Drinking Fountains, OR any kind of FAN.
You should be creative and selective in your framing to make an interesting composition.Make sure that you have some contrast between your moving subject and the background. A slow shutter can make your subject transparent and it could disappear.
Use a tripod, don’t move the camera, don't change focus between images, just aperture and shutter speed.
You have to have the right lighting to accomplish this.
DO NOT CHANGE THE FOCUS ON YOUR LENS BETWEEN THESE SHOTS!
Do not try this part of the assignment in direct sunlight. With your tripod it can be done in fairly low light. Slow motion is impossible to get in bright sunlight with 400 speed film.


Phase Two~ Experiment with different motion control techniques.
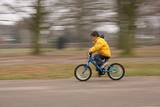
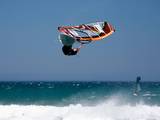
Remember the techniques we discussed in class- Panning the camera, extra long exposures and fast shutter speed to freeze motion.
Shoot a variety of images to try out the different effects. You can shoot long exposures in low light and fast exposures in bright light without making a pair of images. You will submit a strong example of Motion in your Final Portfolio at the end of the semester.
Be sure to check your light meter to avoid over and under exposure.
Two Prints (5X7):
Make two photographs of the same subject. One will show frozen motion and the other blurry.
These two exposures should be taken from exactly the same position - they should look the same except for the change in motion.
One Print showing either Frozen or Blurry motion not from your motion pair.
You will turn in your film log and contact sheets that show how much effort you put into this assignment.
Make sure everything that you turn in is labeled. Name - Date - Roll # - Frame #
Tue, February 25, 2014