Experimental Photographs
Photographs that go beyond the “straight photograph” using special materials and or techniques.
These photographs are created in the camera or in the darkroom.
EXPERIMENTAL PHOTO EXAMPLE ALBUM1) Photogram
2) Multiple print from 2 negatives, 2 enlargers (or more)
3) Combination print from sandwich negatives
4) Paper Negative Print
5) Solarized Print
6) Bas Relief
7) In camera double exposureFor the assignment:
Shoot a new roll of film including double exposures and frames to use to make an experimental image.
Experiment with your camera to create double exposures in your camera on this roll.
In class we will experiment with your new negatives plus any images you have already taken.
Think of images you already have when you shoot textures and objects to make multiple images
ManRay Rayogram (Photogram)
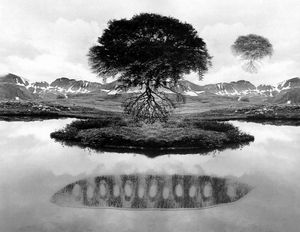
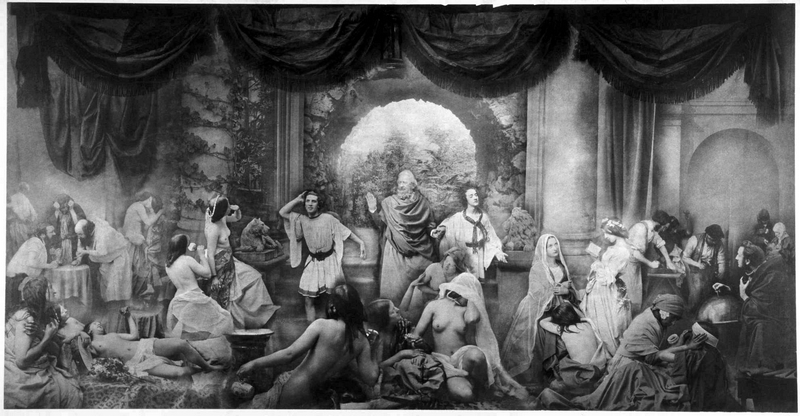
Uelsman- Floating Composite Print
Sandwich Negative
Solarization
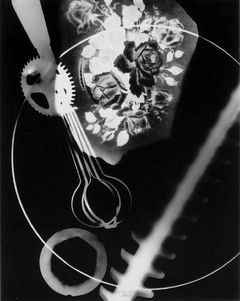
Photogram:
a camera-less print made by shing enlarger light through
transparent, translucent and opaque objects placed on photo paper. Moving
objects during parts of the exposure can create overlapping and blended
elements.
Negative
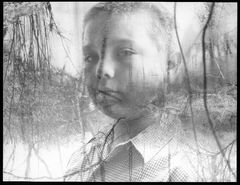
Sandwich: Using several negatives on top of each
other in the enlarger carrier. There has to be clear or thin areas on
the negtives to let light through both. Because they are together in the
enlarger- you can’t alter the size relationship between the images
- you can shift them offset from each other. Print the combination as
if they were one negative.
Paper negative print: a print of reversed values
made by contact printing a positive print on another piece of paper under
glass just like making your proper proof contact sheet. Contrast filters
and burning & dodging can be used. Make your positive print on paper
without writing on the back.
Multiple Printing: Combining two or more negatives on one print. Two or more enlargers makes this easier. Test prints and drawings help with alignment- burning & dodging might be necessary. Allowance needs to be made for different areas of density in the negatives to make the images blend well. This technique allows you to change the size of each image in the enlarger to fit together appropriately.

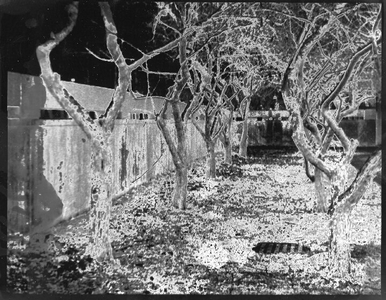
Solarization or the Sabattier Effect is the process of re-exposing photographic paper during the development process. The result is an eerie silver image which contains light lines between the shadows and the highlighted areas.
Areas that have been exposed the least are affected the most during the re-exposure of the print. The darker areas or shadows on the prints show little change during the solarization process.
Bas Relief - In the dark room to create a Bas Relief image you would combine a positive and negative of the same image copied on continous tone film, which was then sandwiched slightly out of position in the negative carrier. Depending on how the the film was sandwiched would change which side the shadows would appear. The result of this could be quite abstract, with some thought needing to be given to the subject of your image. The best images used are those with strong textual or graphic qualities.
---------------------In Camera Techniques---------------------
Double or multiple exposure-
1)exposing the film more than once without advancing the film. Some cameras have this as a built in feature, some need to be tricked to shoot the second time without advancing the film.
2) opening the shutter (camera on tripod) in a darkened room and using a spot or flashlight to “paint with light” on your subject.
3) Run the film through the camera twice. Mark how your film lines up when you load your camera, shoot first exposures on the roll and then rewind the film but not all the way. Reload the same film in the camera and make 2nd exposures on top of the first.Filters on the lens: there are many commercial filters that attach to the front of the lens to modify the light entering your camera. Some are colored to filter out different parts of the spectrum. Yellow makes white clouds stand out against a blue sky. Green makes green objects lighter (trees) and red objects darker (on black and white film).
There are also filters that distort and add special efficts to the image- starburst, diffusion etc.
You can use anything in front of your lens for special effect such as saran wrap, nylon mesh, crinkled plastic---Special Films: Infrared film that is only sensitive to infrared (below red invisible) light- available in rolls.
Orthochromatic film that is not sensitive to red light- can be used with a red safelight. Orthochromatic film may be high contrast “litho” film or continuous tone copy film. This film can be cut into small pieces and placed inside your camera in the darkroom. This film can be developed in dektol (print developer).Paper negatives: in place of film, you can put pieces of your printing paper in your camera and make single or multiple exposures - experiment to get the right exposure.
There are countless other ways to do experimental photography- these will get your imagination started.
Hand coloring - Bas relief - Cliché verre - Sabattier effect - Liquid light - Collage - Pinhole camera - Mixed Media